View printable page
VPN How-To
VPN How-To
VPN 是 Virtual Private Network
的縮寫,意思是虛擬私有網路,也就是在公開的網路架構上,虛擬一個私有的網路。這個虛擬的網路架構具有和真正私有網路一樣的安全性、管理便利性及效能。VPN
的目的是用來取代原本專線式的私有廣域網路,以更符合成本效益的方式來達成相同的目的。
舉例而言,如果您有二個分公司位於不同的城市,每個分公司內部都有自己的私有內部網路,而二個公司的內部網路原本是無法連接使用,除非建立一條專線,以連接二個公司的網域。然而,若改用 VPN
的方式,我們可以使用現有的網際網路架構,在二個公司分別架設 VPN 伺服器,則二個不同城市的公司內部網路就可以連接起來。另外,我們也可以從家裡使用
Windows VPN 撥號連線到公司內部網路中。
和傳統的專線式私有網路相比,由於 VPN
使用現成低廉的網路架構,所以成本上便宜許多,而且日後不論是要進行線路變更或架構更動也比較容易。本文中,我們將介紹如何使用 FreeBSD 建立 VPN
Server,讓使用者可以從 MS Windows 上使用 VPN 撥路連線到公司內部網路。
我們使用 mpd 這個軟體來建立 PPTP 的 VPN 連線,PPTP 是 Windows 所使用的 VPN。我們在 FreeBSD
上建立 VPN 之後,使用者可以自遠端使用 Windows 經由 Internet 使用 VPN 撥號連到公司的內部區網。
基本架構如下:
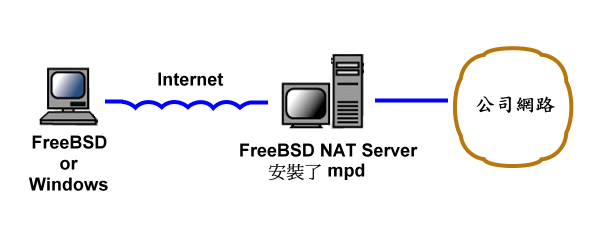
我們假設公司內部網路 IP 為 192.168.x.x,而 FreeBSD 這台 NAT Server 上,我們另外安裝了 mpd 這套 VPN
軟體。
步驟一:
請先確認在 Kernel 中有下列這行設定:
# 如果您使用的是 FreeBSD 4.x
pseudo-device	tun		# Packet tunnel.
# 如果您使用的是 FreeBSD 5.x 以後
device		tun		# Packet tunnel.
|
步驟二:
接著我們要在 FreeBSD 的 NAT server 上安裝 mpd5,請使用下列指令安裝:
# cd /usr/ports/net/mpd5
# make install clean
如果過程中有出現設定選單,使用預設值即可。
步驟三:
安裝完畢後,在 /usr/local/etc/mpd5 目錄中,新增一個
mpd.conf,並編輯內容如下:
startup:

# 預設使用 pptp_server 這個項目的設定
default:
	load pptp_server

pptp_server:
	# 設定一個 IP Pool 名為 LANPOOL,這個 IP Pool 就是要當 VPN client 連上來
	# 後,伺服器要分配給它的 IP。我們只允許 5 個 client 連接,所以只設了 5
	# 個 IP (56~60)。
	set ippool add LANPOOL 172.16.0.56 172.16.0.60

	# Create a bundle template named VPN
	create bundle template VPN

	# Interface configuration
	# On demand is only useful when we want to make an outgoing connection
	set iface disable on-demand
	set iface idle 0

	# Since we do not want to play routing tricks we'll proxy arp
	# to the LAN so traffic will find its way to the interace
	set iface enable proxy-arp
	set iface enable tcpmssfix

	# IP options
	# TCP header compression
	set ipcp yes vjcomp

	# VPN server 的 IP,當 VPN client 連上後,客戶端及伺服器端都會有一組新的 IP。
	set ipcp ranges 172.16.0.1/32 ippool LANPOOL

	# This is the resolver that is available on the local lan
	###set ipcp dns 10.15.22.155

	# Set the encryption on the VPN
	set bundle enable compression

	# Let this bundle use mppc
	# Use 128 bit MMPE encryption
	set ccp yes mppc

	set mppc no e40
	set mppc yes e128
	# Less secure but fastre recovery from lost packets
	set mppc yes stateless


	#Create links
	create link template VPNLINK pptp

	# Set bundle template to use
	set link action bundle VPN

	# Multilink adds some overhead, but gives full 1500 MTU.
	set link enable multilink

	# Enable address and control field compression, and protocol
	# field compression
	set link yes acfcomp protocomp

	# Turn pap and chap type authentication off.
	set link no pap chap

	# Require CHAP authentication from the peer NB: Use enable The
	# use of enable and accept have slightly different meaning in
	# the context of PAP and CHAP.
	set link enable chap

	set link keep-alive 30 300

	# We reducing link mtu to avoid GRE packet fragmentation.
	set link mtu 1460

	# Configure PPTP
	# the address to which you will have to connect using your vpn client
	# 設定 VPN 伺服器的對外 IP。
	set pptp self 59.124.41.242

	# Allow to accept calls
	set link enable incoming
|
步驟四:
然後我們要新增一個文字檔 /usr/local/etc/mpd5/mpd.secret 存放使用者資料及密碼,其格式為
username password:
alex	Saophone
bill	Pwanuts
john	mypasswd
|
由於這個檔案內容包含了 password,所以我們必須將它設為只有 root 可以讀取:
# chmod 640 /usr/local/etc/mpd5/mpd.secret
步驟五:
接著我們要編輯 /etc/rc.conf 以在開機時啟動 mpd5。
mpd_flags="-b"
mpd_enable="YES"
|
現在我們可以啟動 VPN 服務了:
# /usr/local/etc/rc.d/mpd5 start
步驟六:
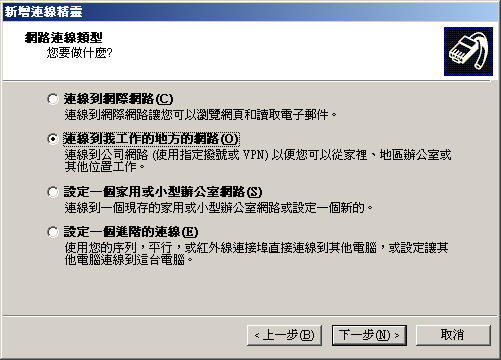
在 Windows 端的設定方面,請在控制台的網路連線中建立一個新的網路連線:
下圖中,我們選第二個選項,以建立 VPN 連線。
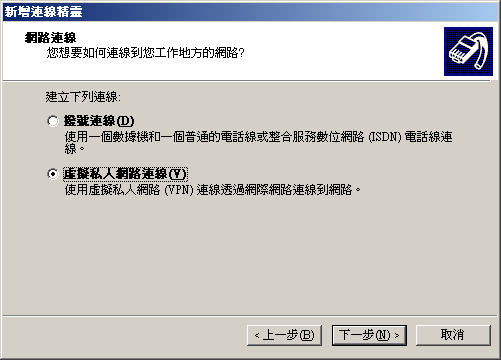
依照畫面中的指示,我們選擇建立一個虛擬私人網路連線:
請您為這個連線命名:

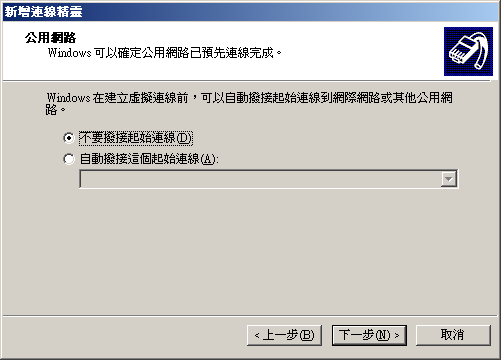
如果您使用 ADSL 或 modem,在使用 internet 之前必須先撥號連線,您可以在這裡選擇當使用 VPN
時先自動撥接,或者您可以可選擇不要撥接起始連線,只要您在使用 VPN 時先將電腦連上 Internet 即可。
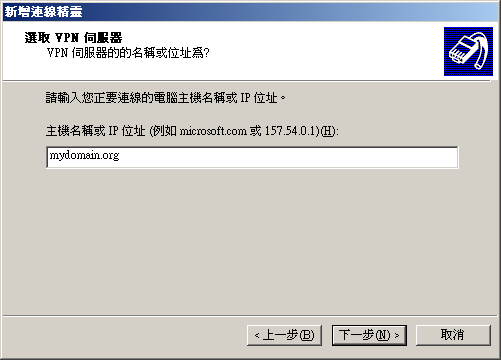
接著請輸入 VPN 伺服器的對外 IP,您可以可以輸入 domain name。
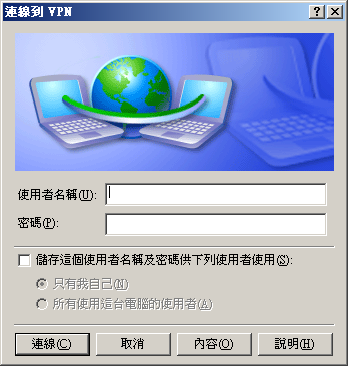
完成後,會自動跳出一個撥號視窗,您也可以在控制台中的網路連線中找到您新增
的VPN 連線。在下圖出現時,請選擇內容:
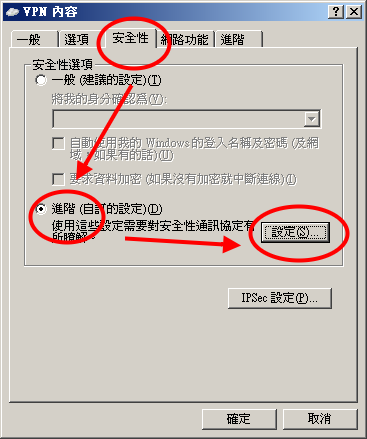
接著請選擇[安全性] 的標籤,在安全性選項中,我們選擇[進階] -> [設定]:
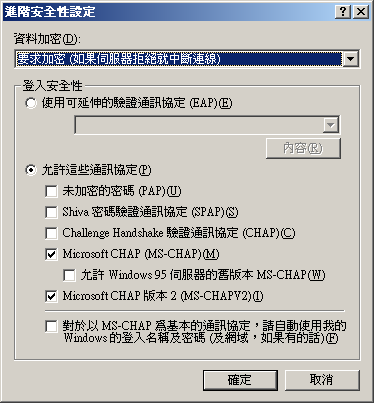
進入進階設定後,請確認您的設定是否為下圖所示:
都設定好之後,請按確定回到下列畫面。接著輸入帳號及密碼後就可以進行撥號了。在開始使用VPN 撥號前,如果您使用的是撥接式的ADSL
或Modem,您必須先將建立ADSL 連線,才可以進入VPN 撥號喔。
|

 Home
Home
 SmbFTPD
 Forum
Forum